Recipe of Ultimate Patra / pattarveli na pan / pandada
Hey everyone, it is John, welcome to our recipe site. Today, we're going to prepare a distinctive dish, Simple Way to Prepare Ultimate Patra / pattarveli na pan / pandada. It is one of my favorites food recipes. This time, I will make it a little bit tasty. This will be really delicious.
In regards to cooking healthy meals for our own families, there's obviously some level of dissention among the ranks. The good thing is there are recipes that have become healthy but also the healthful temperament of the recipes is significantly disguised. What they don't know in such instances shouldn't attract harm their manner (outside of allergies, which should not be ignored).
The same holds true for lunches once we often add to your can of soup or even box of macaroni and cheese or any other similar product rather than putting our creative efforts into building a quick and easy yet delicious lunch. You may see many thoughts in this report and the expectation is that these thoughts won't just enable you to get off to a excellent start for finishing the lunch rut most of us look for ourselves in at any point or another but and to test new things on your very own.
With weight and nutrition known as at fault in numerous health conditions it is impossible to dismiss the significance of not only eating ourselves but instead of teaching our kids the value of eating healthy. One way to guarantee that your nearest and dearest are in fact eating healthy is to make sure that you are eating healthy and wholesome meals for them. This does not imply that you cannot enjoy the intermittent calorie splurge and sometimes even you should not. The key to cooking healthy is always learning to control portions and understanding the value of moderation.
Many things affect the quality of taste from Patra / pattarveli na pan / pandada, starting from the type of ingredients, then the selection of fresh ingredients, the ability to cut dishes to how to make and serve them. Don't worry if you want to prepare Patra / pattarveli na pan / pandada delicious at home, because if you already know the trick then this dish can be used as an extraordinary special treat.
As for the number of servings that can be served to make Patra / pattarveli na pan / pandada is 3 plates. So make sure this portion is enough to serve for yourself and your beloved family.
Just in addition, the time it takes to cook Patra / pattarveli na pan / pandada estimated approx 1 hour 30 min.
To begin with this recipe, we must first prepare a few components. You can cook Patra / pattarveli na pan / pandada using 27 ingredients and 14 steps. Here is how you can achieve that.
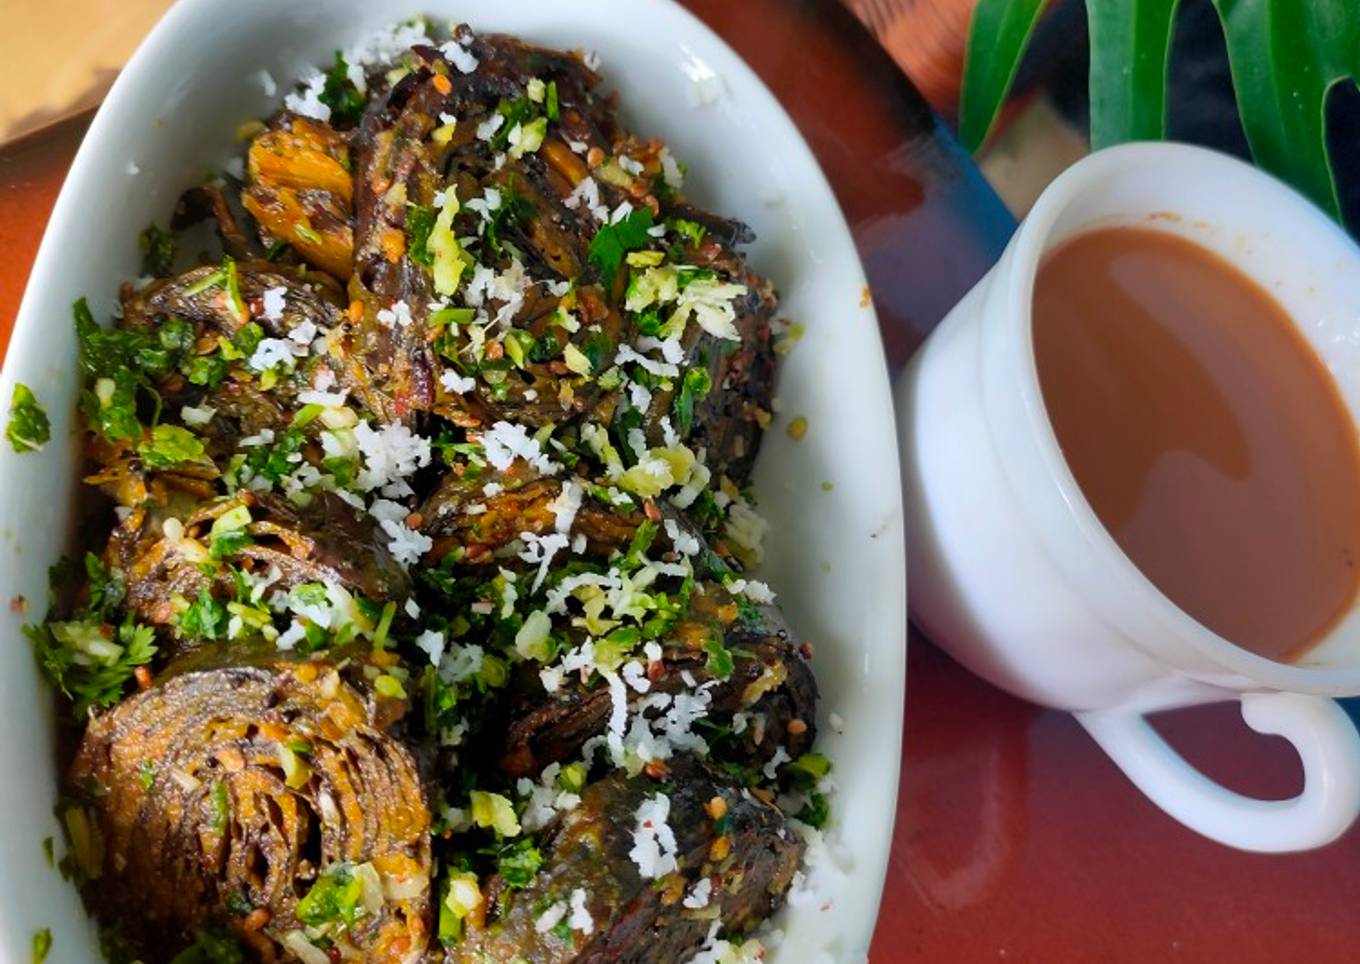
#brunch #mybestrecipe This dish is recognised as various names mentioned in the title in Gujarat. It is a #Gujarati #savoury #savory dish which can be served as a #sidedish , as #breakfast or as an only dish for #light #dinner. It goes really well with tea.
Ingredients and spices that need to be Make ready to make Patra / pattarveli na pan / pandada:
- 150 gr pattarveli leaves (see step 1 for more details)
- For paste
- 150 gr chana flour
- 1 tsp garam masalo
- 1 tsp chilli powder
- 2 tsp dhanajeera powder
- 1 tsp salt
- 1/4 tsp asafoetida powder
- 1/4 tsp turmeric powder
- 1 tbsp ginger garlic green chillies paste
- 3 tbsp jaggery
- 2 small marble size balls of tamerind or 3 tbsp pulp (bhi.imp)
- 1 tbsp oil
- as per taste Sugar and lemon juice
- For frying
- 1 tsp mustard seeds
- 1 tbsp sesame seeds
- 1/4 tsp asafoetida powder
- 4 tbsp oil (preferably peanut oil)
- 2 inches piece of fresh coconut
- 10 cloves garlic
- 4 tbsp chopped coriander
- 2 inch piece of ginger
- 2-3 green chillies (adjustable)
- 1 tsp sugar
- 1 tsp lemon juice
- as required Salt
Steps to make to make Patra / pattarveli na pan / pandada
- Choose pattarveli leaves that have dark purple stems, that are vibrant green (new leaves look deep purple which is ok too) and are tender as well as thin. Don't take the leaves with green stem (see pic 3).


- Place a leaf on a flat surface and try to remove the stem of it using the knife held parallel to the leaf. Remove the main thick stem as much as possible as well as the small nerves attached to the stem. It is very important to remove them otherwise they hurt in the throat giving an itchy feeling. The hard stem also crack the leaf as we fold it. Prepare all the leaves similarly and wash them well. Put them on a tilted plate so the water drops out.


- Dap them dry on both sides with a cloth. At this point, you can pile up the clean leaves and wrap them in a kitchen towel. Refrigerate them for later use (use up within a week).

- Take about 3/4 cup water (150 ml) in a bowl. Add tamerind and jaggery. Heat up and bring it to boil. Rest aside till the jaggery melts and tamerind gets tender. Sieve it while catching the water.


- Combine all the ingredients for paste. Mix well and then add the jaggery-tamerind water. Add oil. Combine well.


- The paste should be loose, but thick (ribbon consistency) like cake batter. Add more water if required. Add more chanaflour if it is too thin.


- Pay a big leaf upside down on a flat surface. Apply this paste evenly all over the leaf. Do not apply too much or too little paste. Put another leaf on the top of it, upside down and pointing the other way round. Apply an even layer of paste on it. Similarly make total 5 layers of leaves on the top of each other, placing each in the opposite direction of the previous leaf.


- Now fold inwards the two long sides of the leaves. Each fold should be not more than 3 fingers wide. The width will be lesser for smaller leaves. Now start rolling tightly from the top coming down. Apply a small amount of paste on each fold.


- This is how the roll will look. Prepare such rolls using all the rest of the leaves.


- Prepare a steamer with some water in a deep pan and a plates with holes in it. Put it on medium to low heat. Place the rolls in it. Cover and cook for about 30 min.


- When ready, the rolls will turn darker in colour, will look tender and a knife will be easily pricked through. Cut the rolls into half to one cm thick discs. You can store them in a refrigerator if you are planning to use them on the next day. Bring them to room temperature before use.


- At the time of use, combine coconut, ginger, garlic, green chillies and coriendar leaves in a nut chopper (also known as chilli cutter). Grate them all together. This way we'll get coarsely grated texture of them. That's exactly what we are looking for. Heat up oil in a pan. Crackle mustard seeds and sesame seeds. Add asafoetida powder and then patra (the discs make from the cooked rolls of leaves).


- Add the paste (keep a little to garnish), lemon juice and sugar. Adjust other seasonings as per your taste. Combine everything very well. Remove from heat. Transfer them in a serving plate, garnish with the remaining paste. You can also grate some more coconut over them. Serve hot or at room temperature with tea.


- Method : 2 Above method makes very well moistured and sift Patra. If you like crispy Patra, you can shallow fry them on a flat nonstick pan after crackling mustard and sesame seeds. Shallow fry till they are golden and crisp on both the sides. Crispy version of it makes patra a bit dry do they are not so favourite of mine. However, they taste nice on the next day. Still I prefer the first method.
It's those little steps you take towards your aim of cooking healthy foods for the family which may matter a lot greater than any leap. Before you realize it that you may realize that you all have more energy and a much better sense of general wellbeing than you would have envisioned before changing up your cooking customs. If this is not sufficient to encourage you however, you can check out the excuse to shop for new clothes when you lose a size or 2.
So that is going to wrap this up with this special food How to Make Ultimate Patra / pattarveli na pan / pandada. Thanks so much for reading. I am sure you can make this at home. There is gonna be more interesting food at home recipes coming up. Don't forget to bookmark this page on your browser, and share it to your family, colleague and friends. Thanks again for reading. Go on get cooking!